


Are you like me and your phone constantly warns you “Out of storage”? As someone who values preserving memories and who refuses to pay monthly premiums for more online storage, I make it a habit to manually back up my iPhone photos to an external hard drive using my MacBook. I want to preface this by saying, I also like to use the 3-2-1 rule.
The “3-2-1 Rule” is a widely recommended strategy for backing up data, including photos. This rule helps ensure that your important files are safely stored in multiple locations to prevent data loss. Keep at least three copies of your photos as things happen and you don’t want to lose them forever. Here’s how it works:
- Old-School Photo: I like to print my favorite photos and store them in photo albums. This also helps you recognize which photos mean the most to you. You can store them in fire/waterproof storage for safe keeping. Some folks also make “Annual Yearbooks” or photo books. I like the idea, but haven’t found time to do this.
- Shutterfly allows unlimited photos to be uploaded to their website and free 4×6 photos if you order off their app (Be careful as sometimes they crop photos and cut your head off, quality is decent)
- Sam’s Club charges .10 per 4×6 photos and sometimes they run a half off deal (I’ve been impressed with the quality)
- Cloud Storage: Storing them online like Facebook, Instagram, Shutterfly, Sam’s Club Photo, iCloud, Google Photos, Dropbox, etc. When I print photos, I have to upload them to a website that later will let me download them for FREE. I also have Google Photos turned on in case something happens to my phone; however, it’s ‘out of storage’ and once I delete them off my phone, they delete there as well. So just be mindful of where and how you use cloud storage.
- External Hard-Drive: I actually have 2 external hard drives that are 2TB each. This allows me download and organize my photos. Why do I have 2? It’s technology. I would be crushed if I plugged it in and nothing showed up, so I have it backed up on 2 separate ones just in case.
By following the 3-2-1 Rule, you significantly reduce the risk of losing your photos due to hardware failure, theft, or other unforeseen events.
Here’s a step-by-step guide to ensure your precious moments are safely stored.
Step 1: Plug in the Cords
First, connect your iPhone to your MacBook using the appropriate cable. Then, plug in your external hard drive to the MacBook. Ensure both devices are securely connected and recognized by your Mac.
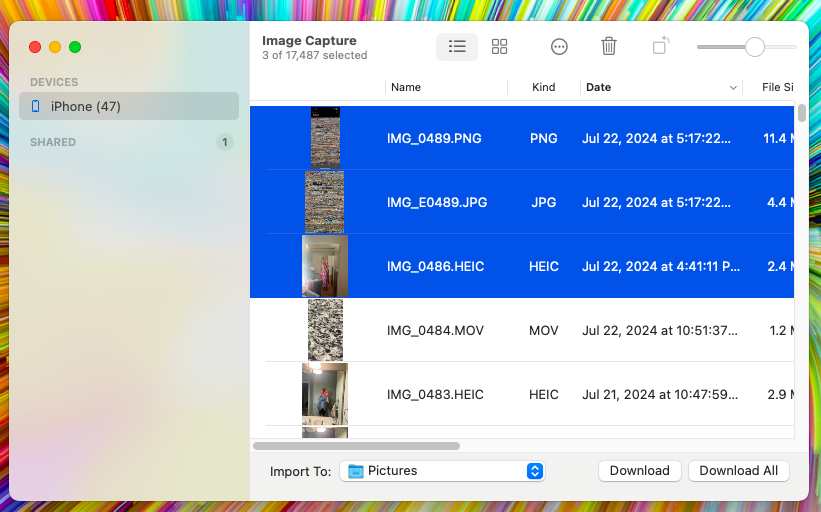
Step 2: Open ‘Image Capture’
Once your devices are connected, open ‘Image Capture’ on your MacBook. This app should automatically detect your iPhone and display all your photos and videos.

Step 3: Download Photos Based on Month
In ‘Image Capture’, select the photos you want to back up based on the month they were taken (Command + Up or Down arrow). This will highlight the photos in a blue box. You can do this by sorting the photos by date and selecting the desired range. Download these photos to a designated folder on your Mac.
[I typically save them into a Folder called “Year – Month”. Example “2024-07”]
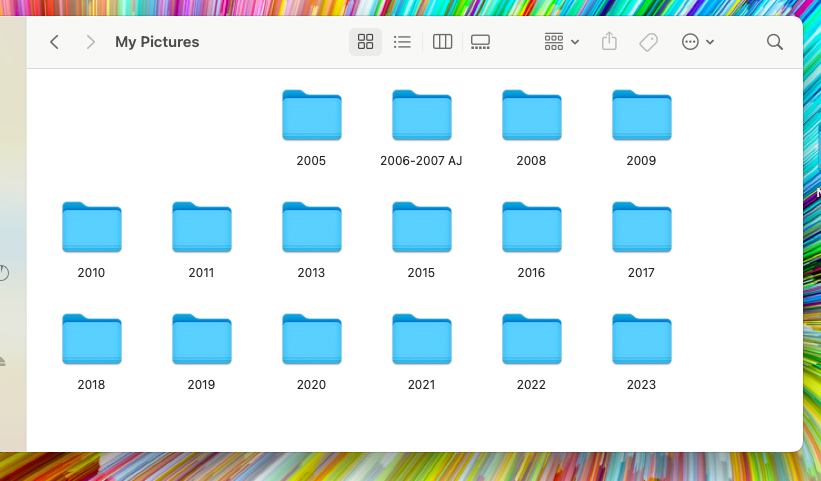
Step 4: Locate Your External Hard Drive
This will open a new window displaying the contents of your external drive. I like to organize by having a folder that says “My Pictures” > “Year”
Step 5: Transfer Photos to External Hard Drive
Navigate to the folder on your Mac where you saved the photos by month. Select the entire folder and drag it to your external hard drive’s window and into the “Year” folder. This process may take a few minutes depending on the number of photos and their sizes.
Step 6: Verify Your Backup
To ensure everything transferred correctly, open your external hard drive and check that all the photos are there. It’s always a good idea to double-check that your backup was successful. I like to compare number of files. Highlight and drag to see how many files are in the folder and verify with how many you downloaded.
Step 7: Safely Eject Your Devices
After the transfer is complete, it’s important to safely eject both your iPhone and external hard drive to avoid any potential data loss. In Finder, click the eject icon next to your external hard drive and iPhone.
That’s It!
Manually backing up your iPhone photos to an external hard drive may seem like a few extra steps, but it’s a reliable way to safeguard your memories. By following these steps, you can rest assured that your photos are securely backed up and easily accessible whenever you need them.
Discover more from WilmingtonMom
Subscribe to get the latest posts sent to your email.

What if you don’t have a Mac, but still an iPhone. Does the process work the same to plug in an external hard drive to my dell laptop?
In short, yes, the process is very similar; however, you’ll be using Windows Photos App instead.